By Home Decor Contributor Alyssa

My mom and stepdad moved to a beautiful new house almost a year ago. She’d had this potted tree that had made moves with her for almost twenty years, to different houses in the same state, to a house with a newly formed family, and even a house across the country. It had been in my home growing up, no matter where we lived, since I could remember. Then, she moved to this gorgeous house surrounded by nature in the middle of the woods…and it killed her plant. The dumb “softened” water at her house killed her plant. It made me so sad to hear that our beloved family tree had died.

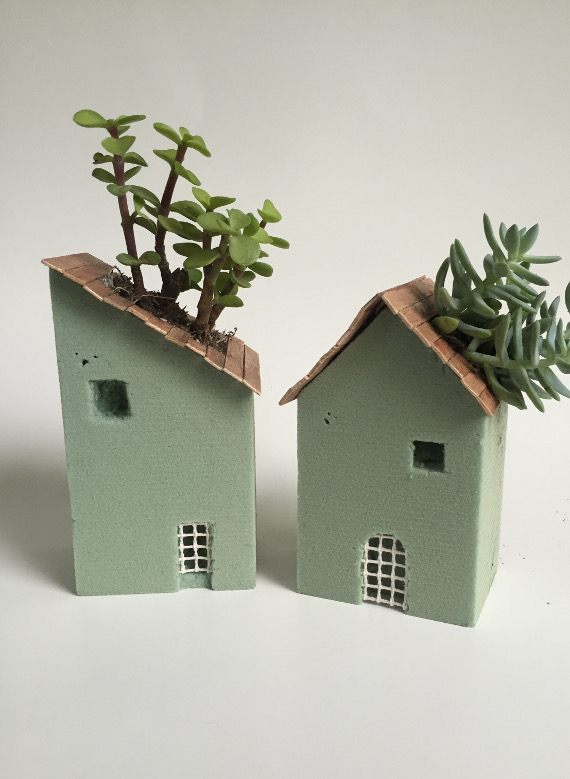
Not that a succulent is anything like a tree, but I wanted to give her something to replace it that would live for a long time, maybe with less water. Less water = less likelihood of death. And because she and my step dad have a very funky, eclectic style, I wanted to put it in a planter that matched that and added to their free-spirited, tasteful-but-doesn’t-take-itself-too-seriously home décor. These little planters (I made her a few because they’re little) are the perfect marriage of those things, in my opinion, and made a wonderful gift for a woman I love.
What you will need:
- Foam blocks
- Craft sticks
- Diluted brown paint
- A sharp knife or small box cutter
- Small amount of mesh latch hook rug
- Saran wrap
- Glue
- Small pair of scissors or craft knife
- Succulents
- An easy to clean working surface
This is a warning: foam blocks are VERY messy and crumble easily. I would suggest doing this project on a large poster board that is easy to vacuum for quick clean up.
To start, mix some brown paint in whatever shade you like with a little water or acrylic medium. “Stain” both sides of 20-40 popsicle sticks, depending on how many planters you would like to make. I used a little over 10 sticks for each house.

While those are drying, lay out your foam blocks and decide how you want to cut them. I wanted mine to be fairly minimal, so I went with two slanted roofs and one normal double-sided roof, and one small door and window for each house

Lightly press a knife across your foam block to create an indent where you would like to cut it.

Carefully line your knife up with your crease and firmly press to cut through the foam block. Your knife should be able to cut through very easily, without any “sawing.” Should be smooth, like butter! You want to make the cut as clean as possible to insure that your roof will lay flat later on.

Next, design the front of your house the same way you did the cut for the roof. Gently create indents for the shape of the door and the window/s.


If you’re satisfied with how these look, take your small sharp knife or box cutter and begin to dig out the door and window. This part is a little tricky, as you do not want to go all the way through the block, but instead make a deep hole.
The best way I found to do this is to cut as deep as you can (that’s where a small adjustable box cutter comes in handy) and create small cutout chunks within the window and door. Cut your first small, deep chunk and wiggle it back and forth until the bottom breaks off and you can pull it out of the hole. Continue doing this, creating more and more space for the pieces to wiggle making them easier to break off and pull out, until the entire window or door has been cut.

I added some little pieces of mesh rug to my doors to give them more dimension, and I love how it turned out! Just trace around the hole for the door and cut a piece of the rug a little bigger than that. Cut down until the piece of rug is just slightly bigger than the hole, then press into the opening until the sides of the rug catch the inside edges of the door and fit snugly in place. It should stay there on its own and be relatively sturdy.


The next thing to do is cut a large hole in the top of the block for your plants. Do this by using the same indentation method you’ve been using, then digging the hole out like you did with the window and door, just on a larger scale.


To waterproof your planter, cut a piece of saran wrap large enough to cover the entire hole and still drape over the edges of the planter. Glue down the edges of the saran wrap to the top of the foam block with some crafting glue and leave to dry overnight

Once the glue has dried, go ahead and use some small scissors or a craft knife to carefully trim the saran wrap so it’s no longer hanging over the edges of the top of the planter. I wish I had done this before adding my roof, but I was a dummy and got too excited.

Next, cut your craft sticks to a size that will cover the roof but still leave the hole for your plants exposed and glue down around the hole. Leave to dry


Find some adorable, tiny succulents and pack them tightly into your planters. Make sure they get lots of sunshine. Succulents do not need much water, so be careful not to overwater them.

So cozy! I’d live in one of these, for sure. ?

![]()