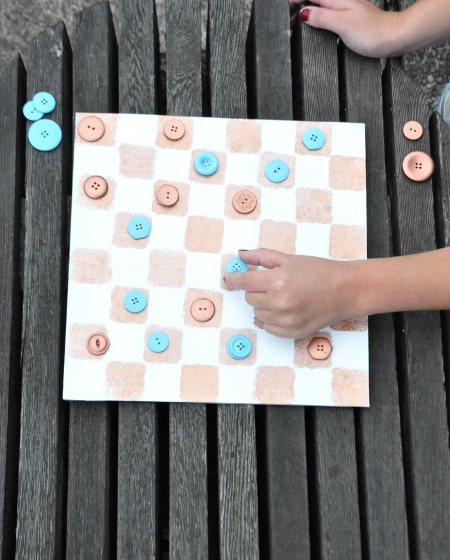

Grab something old and turn it into a sparkling new checkers game! This DIY can easily be adapted to whatever you have on hand. From old art pieces to cardboard boxes and from your ever-growing button stash to bottle caps, you can create a pretty game you’ll love to play.

- A 12 x 12 piece of extra heavy chipboard, cardboard, an old canvas, or an old frame back (like we used)
- Spray Paint in 2 or 3 colors (we used Design Master White , Copper, and Ice Blue)
- 24 Buttons ranging in size from 3/4 inch to 1 inch.
- A brush-on medium for your squares (we used Martha Stewart Liquid Guilding for a pretty metallic effect, but acrylic paint will work well too)
- A Sponge or piece of craft foam
Here’s How to Make It…

If you’re using an old frame back like we are, you will want to remove all of the extra hardware and the outside frame from your piece. Then, you want to hot glue a piece of chipboard or cardboard over your frame back to give it a smoother appearance. If you are using a piece of chipboard or a canvas, you can skip this step.

Spray your board with the white spray paint, or the lightest color that you have. Give it a few good layers to make sure it’s even. Don’t forget to paint the sides!

Divide your 24 buttons into 2 groups of 12. Spray each group your 2 colors. The lighter the spray, the more layers you will need. Our copper buttons covered really quickly, but the blue took quite a while. Don’t get impatient. Make sure to spray even and thin coats until you’re happy with the way the buttons look.

While your paint is drying, take out your sponge or craft foam and mark off a 1 1/2 inch square. Cut it out. If I were to do this again, I would probably go for the craft foam. It won’t soak up as much of your medium and the squares will be more crisp.

Take the edge of your game board, and make a mark with a pencil every 1 1/2 inches. You should have 7 marks total, making 8 squares.

Give your sponge a nice layer of paint. With the sponge, I chose to paint the same side that I marked because the cuts were more even.

Stamp your sponge down from the edge of your board to the first mark. If you’re using a sponge, I recommend rotating it and pressing again 3-4 times. It makes the squares a little cleaner and more defined. Do the same thing on your next mark and so on to the end of the board. Use the squares you made as a guide for the following rows and stagger your stamping to create a checkerboard pattern.

Once everything is dried, you’re ready to play with your pretty new game!

![]()