By General Crafts Contributor Amy

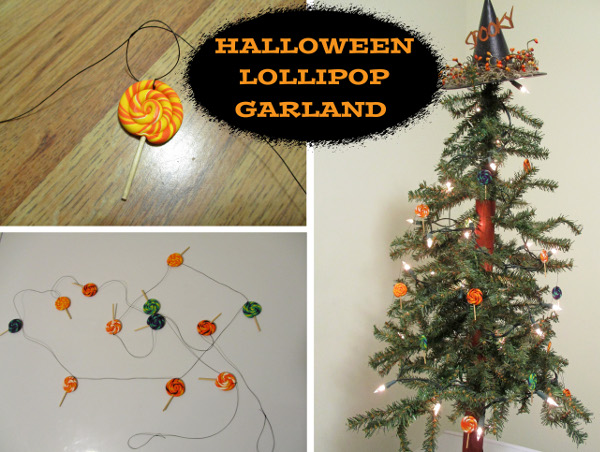
I had so much fun creating the lollipops for this unique garland. It was just what my all seasons tree needed to transition from summer to fall. You won’t believe how fun and easy this project is!

Supplies:
- polymer clay (I used Sculpey III in your choice of Halloween colors)
- findings: jump ring
- jewelry pliers: cutter
- hobby blade
- toothpicks
- thread (I used a thick upholstery thread)
- sewing needle
- a quarter for size reference
- optional: Sculpey Glaze (for a protective shine) and a paint brush to apply
- optional: cutting board or clay mat for work surface

STEP 1: Roll out 3 colors of clay with your main color the thickness of about your pinky finger and your other 2 colors just a tad thicker than a toothpick. (They were all the same length at about 3 inches long and I made 3 lollipops with little amount of scrap using this amount of clay)
STEP 2: Arrange clay so that the middle of you work is the thickest color of clay and you other 2 colors are opposite one another.
STEP 3: Roll your clay out and to twist it. Now your work should be about 1cm. thick and nice and twisted.
STEP 4: Take one end and roll it like a cinnamon roll.

STEP 5: When you have rolled your work to about the size of a quarter trim it at an angle and finish rolling your work.
STEP 6: Insert a toothpick into your work near where you finished rolling. Remove toothpick.
STEP 7: Make a hole (opposite where toothpick was inserted) between the first and second rolls of your lollipop candy using a sewing pin.
BAKE: Bake clay as directed. I used Sculpey III which bakes at 275 degrees for 15 minutes per 1/4 inch thickness. I baked mine for 15 minutes. Let it cool.

STEP 8: Re-insert a clean toothpick and trim using cutter jewelry plyers. If you have rough edges after cutting smooth them out with sand paper or an old nail file works just as well. My toothpicks were a tight fit but, if you wish to you can use glue.
STEP 9: Tie a loop in one end of your thread for hanging. Thread a lollipop and double knot it.
STEP 10: Continue to tie the lollipops to the thread till they are all used. Tie another loop on your finishing end for hanging. I used a tape measure to keep my garland even with 1 lollipop every 6 inches. I made up 12 lollipops so I used 6ft of thread.
ENJOY! Hang them on a tree, in a door way or, anywhere you please.

![]()