By Home Decor Contributor Alyssa

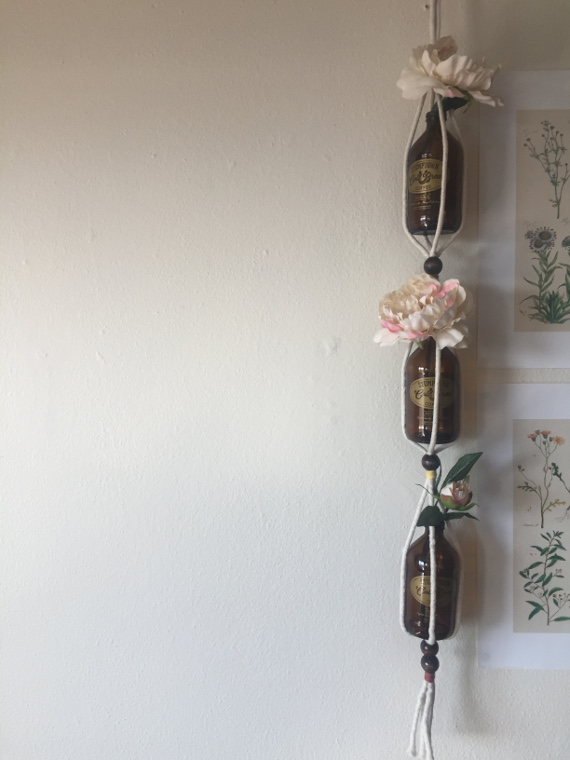
Not only is this an inexpensive way to add some flora to your home, but it’s also unbelievably easy to make. This DIY is a colorful and natural addition to your home decor that will have you ready to fill your house with pretty hanging vases and planters.
My parents just moved to a beautiful property in the woods, and their entire house is surrounded by plants. I got so jealous while I was home visiting that the second I got back to my apartment, I dragged my boyfriend to Home Depot and we basically bought a jungle to replace the dead one I had recently thrown in the dumpster, not only to surround myself with pretty things, but to prove that I’m not a total menace to all plants. They’re still alright. I’m starting to become a bit obsessed with my little plant babies, and decided I needed a way to keep a couple more inside (that weren’t cacti in IKEA pots like the rest of the flora I have inside my apartment).
Enter the hanging planter.
I know these are super trendy right now, and they fit my recent macrame theme. However, I saw one that I thought looked incredibly easy to make, involved no knotting of rope, only took me about 15 minutes to create from start to finish, and literally cost me less than $5.
Materials you will need:
- 1/8” Cotton piping (I used about 80” of it, but it’s cheap so buy more, you’ll want more than one of these puppies)
- Wooden beads (with a large hole, I happened to have mine lying around)
- Colored yarn
- Scissors
- Tape
- Darning needle
Begin by cutting two equal lengths of rope. Mine were a little over 40” each, but my pots are small. If you plan on using large pots, you will want to cut longer pieces of rope.

Fold the pieces of rope in half, creating a loop at the top for hanging.

Cut a piece of yarn (about 14”) and wrap it around the base of your loop.

When you have about 4” of yarn left, thread the end through your darning needle. You are going to pull the end of the yarn under and through the wrapped bit you just created, and tie it off. You can then sort of tuck the end back under the rest of the yarn.


Next, take your four ends of rope and wrap them very tightly with a piece of tape, making it easier to push through your beads. I ended up wrapping tape around about two inches of my rope’s ends, so I had something sturdy to push through the beads.

Decide how much room you want to leave between the top of your hanger and your first pot. Push your bead up the rope to that spot. Repeat this for each bead, keeping the distance between each bead the same. You can add as many beads as you want pots on your hanger. I did three. Cut the rope right above where you had the tape to get rid of it. If you try to pull it off, it won’t look pretty.


To add some color to my hanger, I took a couple more colors of yarn and wrapped them around the rope directly beneath each bead, just like I did at the beginning, Except this time, when I went to thread the yarn under the wrapped part, I pulled it all the way through the bead and sort of tucked it in at the top of the bead, as it was tighter and more secure than my yarn.

That’s it! It’s really that simple. Instead of putting pots in my hanger, I went with some old Stumptown cold brew bottles we had lying around at my work, and I used fake flowers (those don’t need sun…and don’t die).

Now I’m going to go make about six more, because why not? Enjoy!
![]()