By General Crafts Contributor Michelle

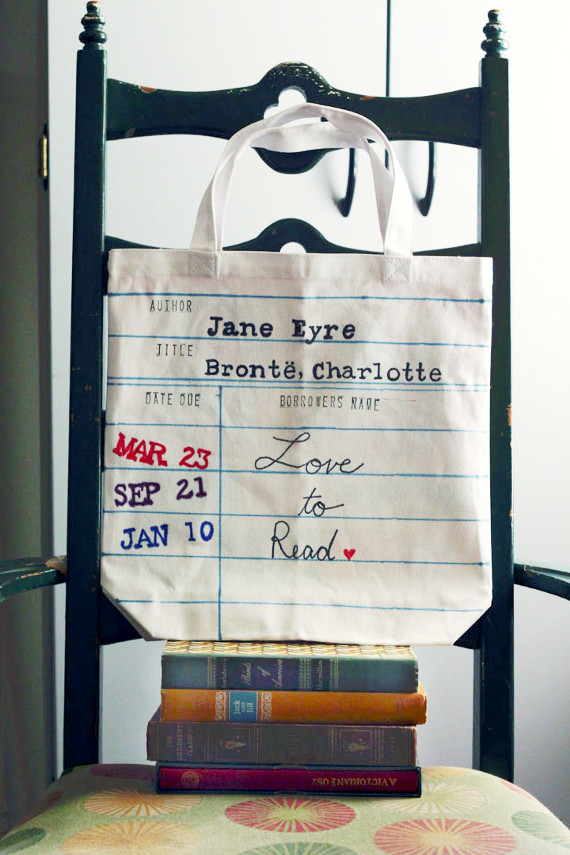
Hearken back to the days of library card catalogs, writing your name on the card for each book you checked out, and the librarian stamping the “date due” with her rubber stamp. Bring some “old school” library fun to your life by making a special library book themed tote bag to transport your books to and from the library, or make one as a gift for your favorite book lover!

Here’s what you’ll need to make your own:
- Mark Richards Blank Canvas Tote 13.5″x 13.5″x 2″ Natural.
- Permanent, or fabric markers.
- Ruler.
- Hero Arts Rubber Stamp Kelly’s Shadow Letters.
- ColorBox Archival Dye Ink Pad Full Size, Wicked Black.
- Tracing Paper by Dritz Assorted Colors 5pc.
- Pencil.
- Computer and printer.

To begin, use your pencil and ruler to mark where the horizontal lines of your library card will go. My lines are spaced 1 1/2-inches apart–if you use a bag with different dimensions, you may want to space your lines differently.

Be sure to make a double line as your third line down (see photo), to separate your “author” and “title” lines from the “date due” area, just like on a real library date due card. Use your marker to draw your horizontal lines. My markers bled a bit, so I just pressed lightly. Once you’ve drawn your horizontal lines, measure over 4-inches from the left side, and draw a vertical line down from your double line. If your bag is different dimensions than mine, just make your line about 1/3, or slightly less, over from the left-hand side.

Next, use your stamps and ink to stamp “AUTHOR,” “TITLE,” “DATE DUE,” and “BORROWERS NAME,” on the lines shown in the above photo.

On your computer, in a typing program, type the author and title of your favorite book. I used a font called “Secret Service Typewriter,” in a 160 pt size. The letters are about 3/4-inch tall when printed. (Once again, depending on the dimensions of your bag, you may want to size up or down on your font size.) Then I typed three different dates for my “due dates.” Be sure to use all capital letters, and abbreviate the month, so it looks like a date stamp. Print the lettering. Then choose a piece of the transfer paper, stick it under your type, and trace the type onto your bag with the pencil. Press firmly and you should get a good transfer.

Trace over your transferred text with your markers. I used three different colored inks for the date stamps to add some interest.

Finally, if you want, write something fun on the blank lines under “borrowers name.” I wrote “Love to Read,” but you could write your name, or favorite quote, or just “READ.”
Have fun toting your books to and from the library in your whimsical new bag, and be the envy of all your book loving friends!
Happy crafting!
![]()