By General Crafts Contributor Michelle

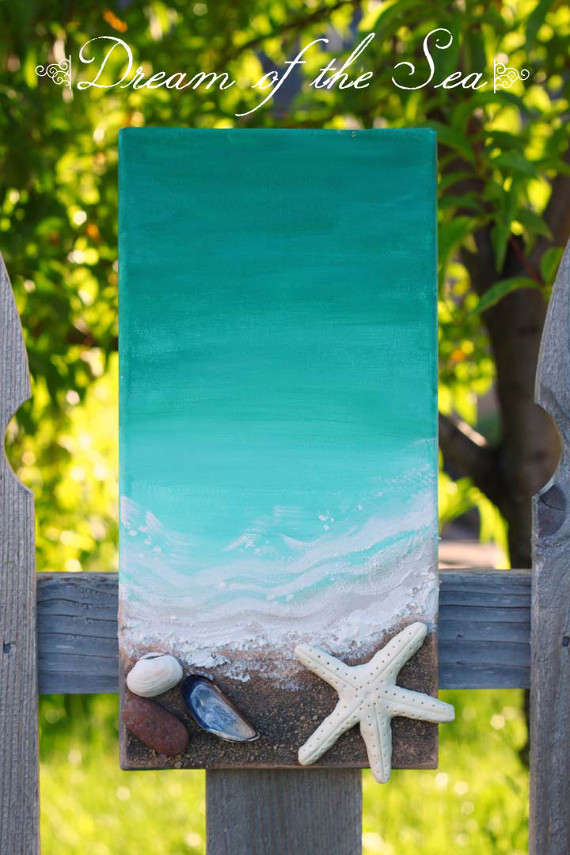
What’s more summery than a vacation to the seashore? Use the sand and shells you collect this summer from your own trip to the beach to make this painting as a neat keepsake of your fun memories, or just use purchased shells and some sand you collect at home to make this painting for some pretty, summery coastal-themed home decor. Any way you create it, the results will have you dreaming of the deep, blue sea!

- A stretched canvas in whatever size you prefer.
- Acrylic craft paint in “sea” colors (I recommend: Ceramcoat Acrylic Paint in #2012 Turquoise, #2068 Christmas Green, #2051 Copen Blue, #2022 Light Chocolate, and white.).
- Matte Mod Podge.
- DecoArt Dimensional Effects Texture Paste.
- DAS Air-Hardening Clay, white.
- Sand.
- Seashells.
- Large flat paintbrush.
- Palete knife.
- Table knife.
- Hot glue gun and glue sticks.

To begin your painting, begin by creating your darkest “sea” color to apply to the top of the canvas. I chose to make my sea colors more green than blue, so I made a dark turquoise color by mixing my darkest blue and green paints together, and then made the resulting color slightly lighter in tone by mixing in some of the light turquoise paint. When you’re happy with the color, apply it to the top third of your canvas.

Next, take your lightest turquoise color and apply it in the bottom third of your canvas, leaving room at the bottom for your sandy shore.

Now that you have your darkest dark, and your lightest light established, fill in the gap between the tones by mixing some of the dark paint into the light paint to establish a gradation of color down your canvas. There is not an exact science to this painting, a lot of it is up to your preference. You can adapt this based on what size and shape canvas you are using, and how much “sea” and how much “shore” you desire to show.

Next use your tan paint to paint in your shoreline. I suggest not making your shoreline straight across, but give it a little bit of character by making it curved and a little higher on one side. Fade the edges of the sand into the sea so you don’t have a bold, solid line.

When your acrylic is dry, coat the sand color with a thick layer of Mod Podge.

Sprinkle your sand onto the Mod Podge, shake off excess, and let dry completely.

While you sand is drying, use your clay to make a starfish. Take a ball of clay, flatten it into a disc 1/4-inch thick.

Use your knife to cut wedges out of the circle to form a star.

Peel away the excess clay, round the edges and ends of the starfish. Use the blunt side of your table knife to make lines in the legs of starfish, and use a wood skewer or pencil to poke holes as decoration. Let dry according to directions on the clay package.

Use your pallet knife or table knife to spread the texture paste along the edge of the water, where it meets the shore, to form seafoam. Make the paste thicker closer to the sand, and thinner near the water, so it mimics the tide rolling onto the sand.

Use your finger to add “foamy” texture to the paste by pouncing your finger up and down. Then smooth the area behind thickest foam in long broad strokes, moving parallel to the shoreline. You can wet your finger slightly to help smooth the paste. Let it dry completely.

Use some white paint on your brush to add light stripes across the water near the foam to represent ripples in the water, and pounce some dots here and there to create bubbles. Let dry. Use the hot glue gun to glue your starfish and seashells to the sand.
Hang your beautiful seashore painting up and dream of summer at the beach!
Happy crafting!
![]()